
Keeping track of your projects costs directly in Jira Cloud
It’s hard to overstate the significance of a tool like Jira for anything stemming from project management. The platform has shown proof to be rock-solid and impactful as a one-stop shop for thousands of teams. However, there has always been a gap, in Jira Cloud, between the ability to associate monetary value to the actual progress of your projects. Up until now, you needed to take extra steps and jump away from Jira in order to gain visibility on your project’s costs: not ideal if you need to make sure your costs are under budget or you need to report to your stakeholders.
This low-hanging fruit has since been addressed and with the help of a couple of apps from the Jira Marketplace, you’ll be able to easily monitor the actual costs of your projects directly in Jira. Today, we’ll explore how two tools, Tempo Timesheets and Cost Tracker for Tempo Timesheets, can provide visibility on your project’s health.
Tracking time to calculate the cost of projects
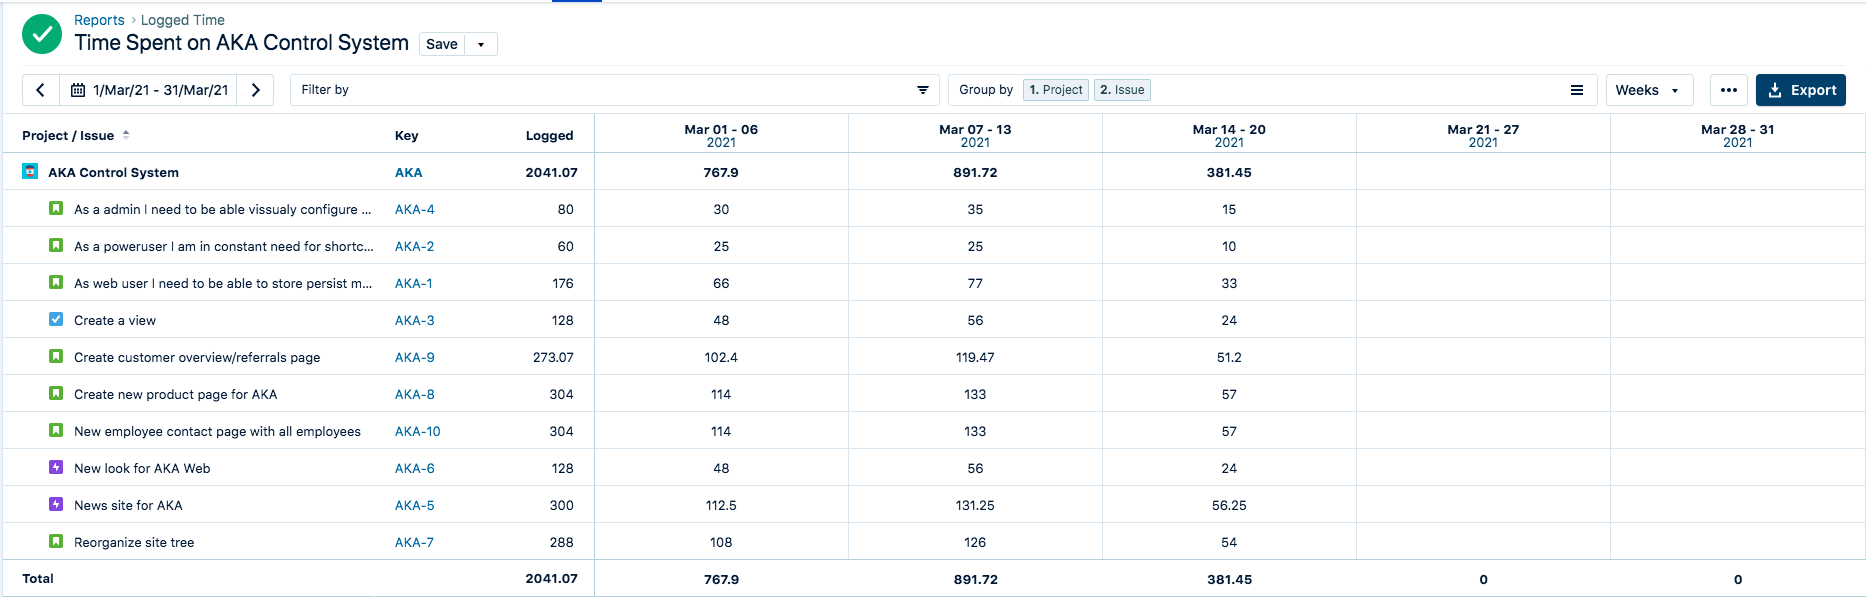
To achieve our end goal of being able to track the costs of a project in Jira, we’ll need to first understand how much time has been spent on it. This is where Tempo Timesheets comes into play.
With Timesheets, users are able to log their daily tasks directly to Jira issues. While this is convenient as it keeps all the data inside Jira, the main advantage in this context is the possibility of overseeing where time is being spent accurately. In other words, stakeholders such as project owners, can reprioritize tasks that are falling behind, and with the help of Cost Tracker, can associate a monetary value to each task and issues of the project to further monitor the health of the project.
Tracking the cost of your projects with Cost Tracker
Once time has been logged on a project by users in Jira, you will have all the data you need to start tracking the costs of your projects.
The process is extremely simple and can be done in less than 5 steps: Create the Project in Cost Tracker, define the scope, define the default hourly rate, and define your project’s budget.
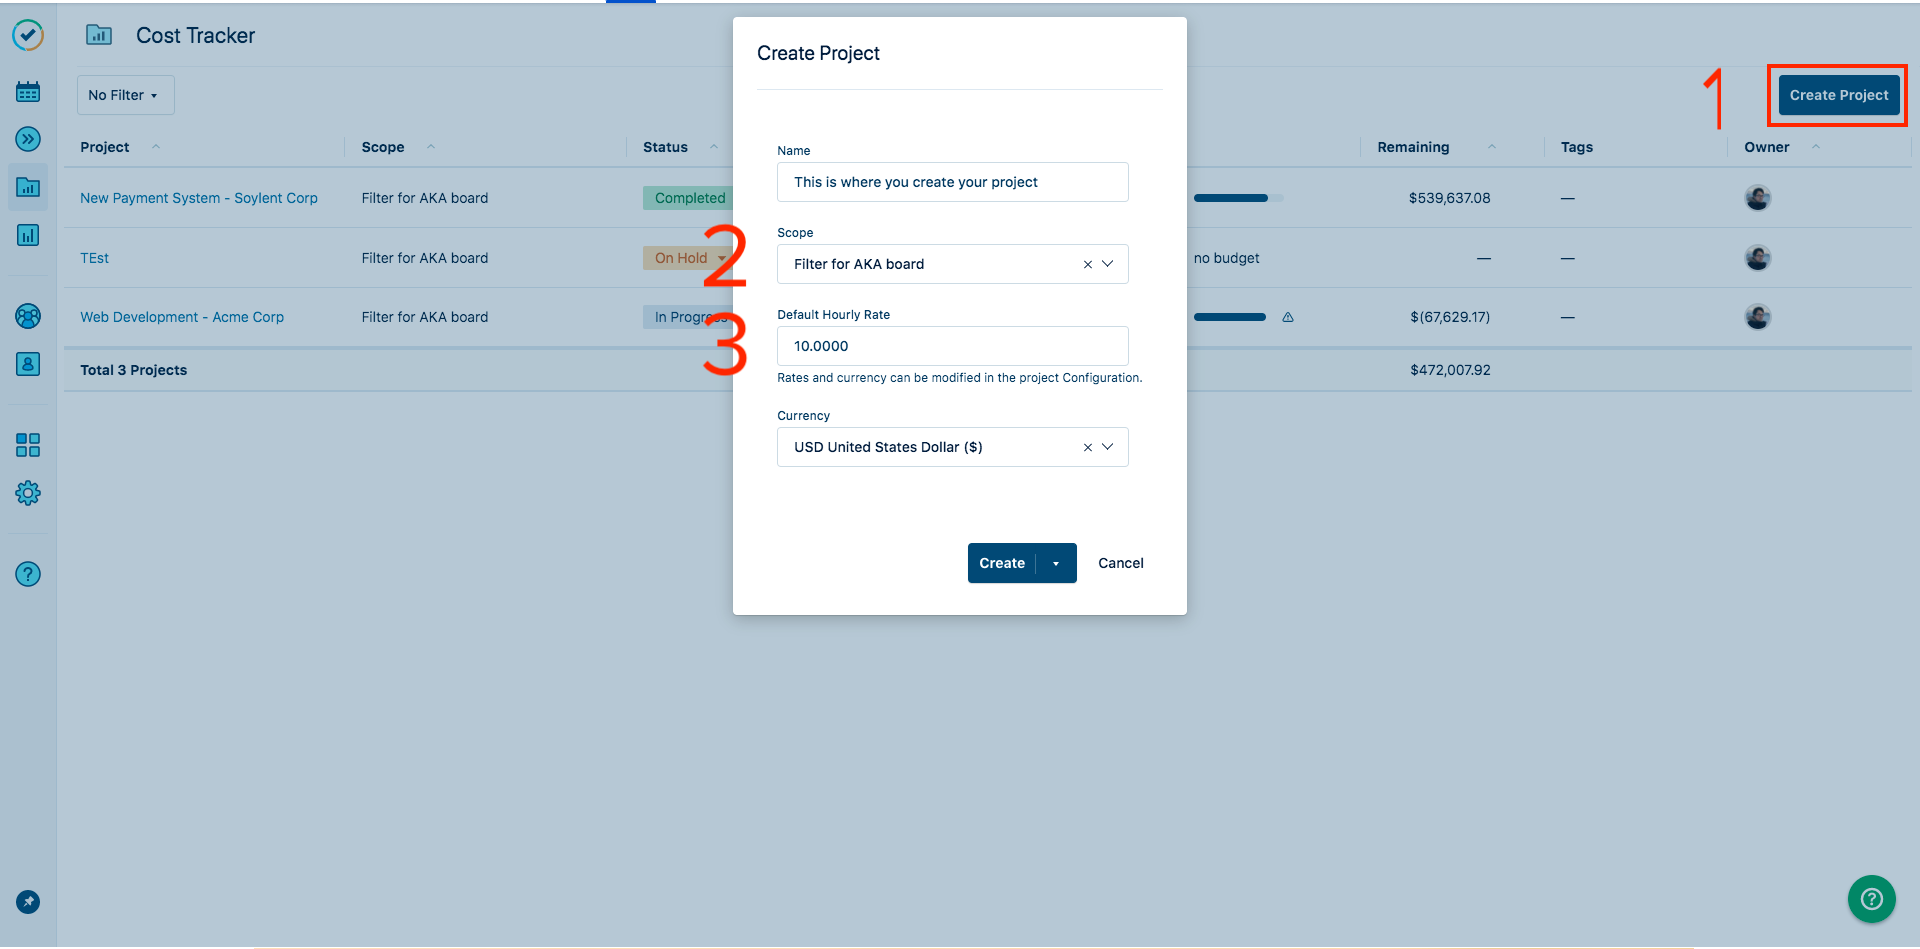
Conveniently, 80% of the process can already be done in the Cost Tracker home page. In this example, we created a project where we wanted to track all the issues related to the “AKA board” and set a default hourly rate of 10 USD per hour, meaning that for every hour logged to the AKA project, it costs the company 10 USD. Once that is defined, Cost Tracker does the calculations automatically, so the process is fairly hands-off.
Finally, the last thing to do is to set a budget, which will be visually represented by an orange line. You could go without one but realistically these occasions are very rare. To set a budget, you can either put a lump sum (e.g: flat amount of 50,000 USD) or you could go with milestones, which are cumulative sums to your budgets being unlocked at certain dates (e.g: 10k USD from Jan. to Feb., 15k USD from March to May).
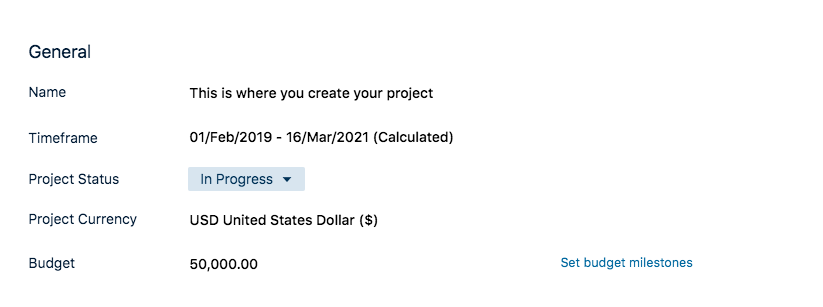
You can add the budget and the Milestones from the Configuration Tab of a Cost Tracker Project.
Now that all the key variables have been defined, you will see in the “Overview” tab how the project is doing cost-wise based on the variables that you defined.
As can be seen from the image above, we are doing a terrible job at respecting our budget. We can immediately see that we are about 920k USD above our budget, which would be, under normal circumstances, disastrous. Note that we’re able to hover over days to see what our breakdown for costs are. Had we started tracking the cost of the project earlier, we could easily have seen that the costs were going to be too significant and reorganized the scope.
Diving deeper in the data
That being said, we might want to understand what tasks our budget is being allocated to. This level of granularity is possible via the “Scope” tab where all the tasks that are part of the Cost Tracker Project will be broken down on an individual basis by Costs and Time.
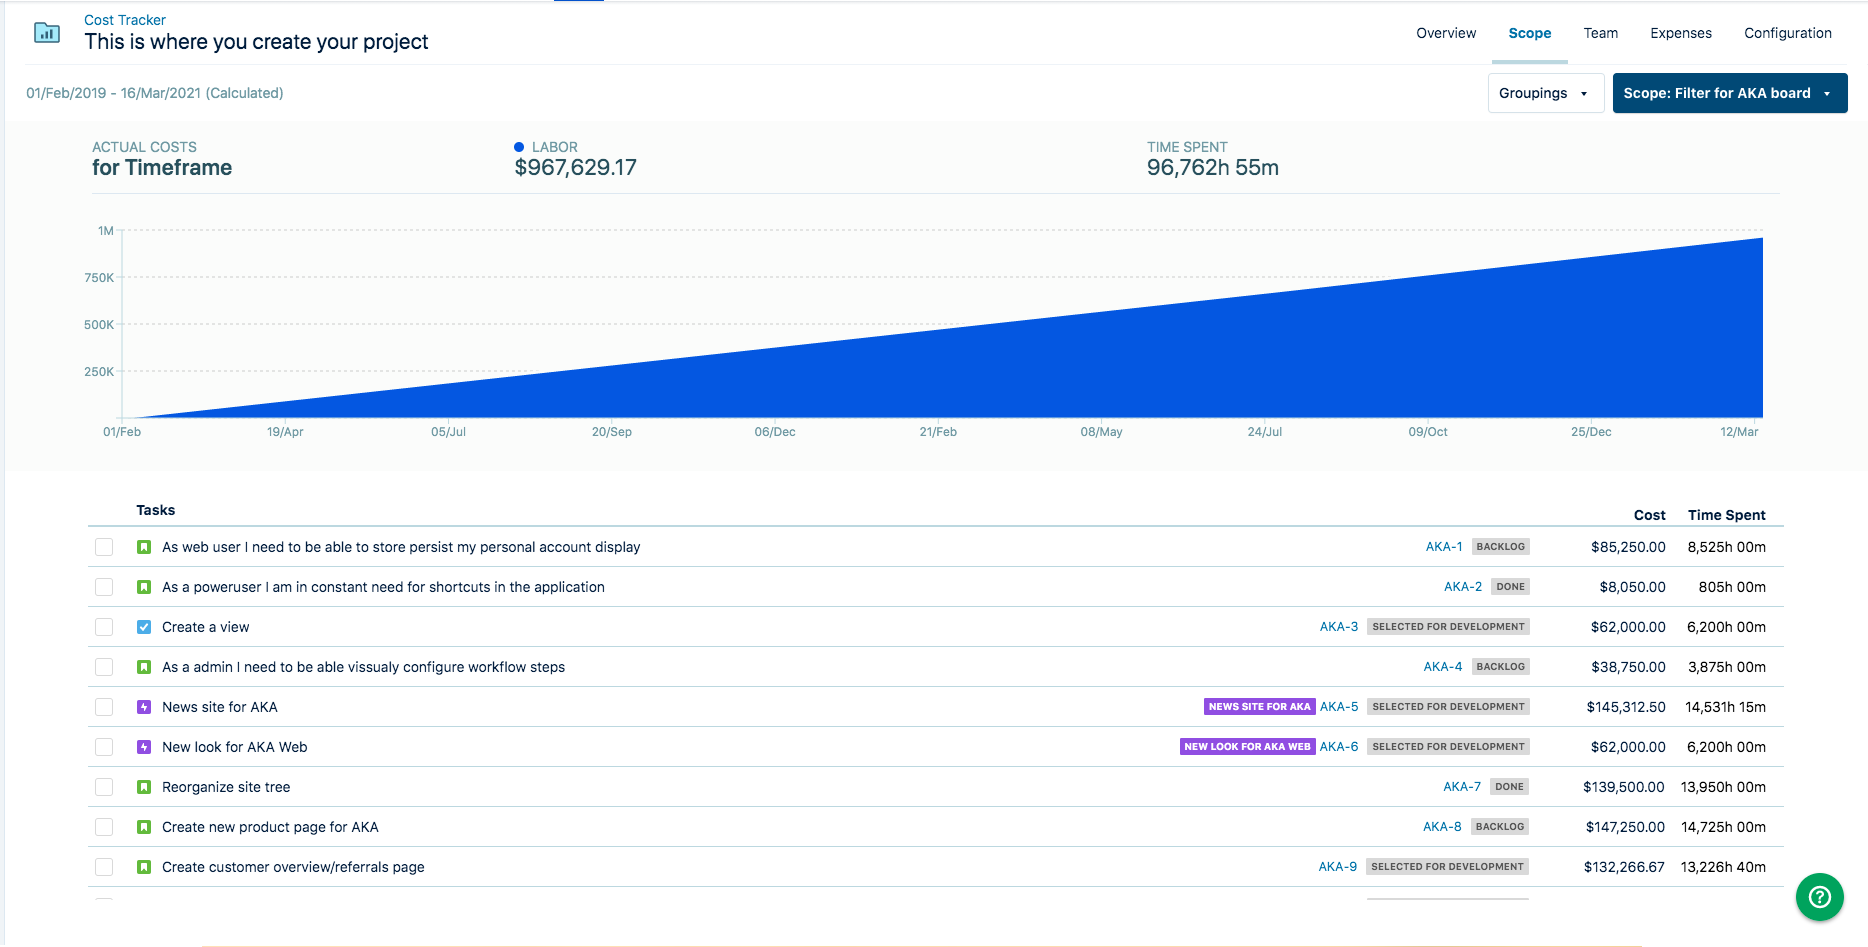
Note that it is possible to organize these tasks by group in order to make the information easier to read. For example, if numerous departments are all working on a project, we might be interested in segmenting the departments to better understand where costs originate from and if they represent the planned costs that we had in mind. Additionally, this could be done to segment different phases of a project, to make sure that each phase is well documented.
One of the main advantages of being able to have the costs and time of an issue is the added visibility from the data. This information can help fuel communications to other stakeholders or clients and keep them up-to-date on the status of the project. In addition, this information can be reused in further projects to help create better approximations as to the cost and time needed to complete tasks and projects of similar nature.
A convenient way to track costs in Jira
We’ve seen how quickly a user is able to set up a Cost Tracker portfolio to keep on top of his project’s costs. The convenience of pooling the data directly from Jira and keeping it in the platform is paired with the added visibility in the actual costs of the project. Indeed, we explored a certain degree of granularity in the data that can be used to help Project Owners understand the tasks that their budget is being spent on and answer if they will be able to finish the project within budget.
You can enjoy a free 30-day trial of Tempo Timesheets and Cost Tracker for Tempo Timesheets from the Atlassian Marketplace.
Related Reading
If you enjoyed this blog post you might like our post on How to Simplify and Improve your Jira Workflows
Comments:
There are no comments for this entry yet.