
How to wire test a Jira server plugin
Here at New Verve, we are developing our first app, and this article is part of a series of lessons learned during our development. It describes how to enable the wired testing console with fast dev off and quick reload on.
Wired Tests and The Benefits
Testing is an important part of every software development, no matter how big or small. The Atlassian Wired Console as described in the official tutorials is a useful tool for those medium sized plugins, where traditional unit tests do not provide enough assurance, especially those that interact with external libraries (such as Atlassian’s own API). Wired tests have been used in our own plugin development to test discrete parts of the plugin without requiring the completion of the rest of the plugin
The Problem
If you have followed the Atlassian tutorial ‘Run Wired Tests with the Plugin Test Console’, you probably found out that the console was not in the dev tools. This is likely because when you executed the ‘atlas-create-jira-plugin’, QuickReload was enabled and FastDev was disabled. You might still be able to access the wired console directly, for example in our local instance it is at http://localhost:2990/jira/plugins/servlet/it-test-console. You might then run a few tests, and soon find out the tests do not run. There is a developer community post that describes why this is and a quick outline of the solution. In this tutorial, we will provide you the full solution and also make it easier to access (via the top navigation bar).
Step 1: Create the plugin project
Depending on where you are in your plugin development, you might not have created the base plugin files yet. Open your terminal, navigate to the development directory (if you have one) and run the create command:
atlas-create-jira-plugin
When prompted, enter your project details; for the purpose of the tutorial, we will use the following:
| group-id | com.newverveconsulting.jira.plugin |
| artifact-id | jira-wired-console-tutorial |
| version | 1.0-SNAPSHOT |
| package | com.newverveconsulting.tutorial |
Confirm your details with Y or y.
At this point, you will want to use your IDE and import your plugin skeleton that you just created.
Step 2: Add the rest endpoint
We are going to add a REST endpoint to stop the wired console from launching FastDev. Because this endpoint does not need to be in the main plugin, it can be done in the test package.
Let’s add some necessary Maven dependencies first. Open the pom.xml file located in your plugin base directory and add the following Maven repository:
... ... ...... com.atlassian.plugins.rest atlassian-rest-common LATEST provided
Now to add the actual REST call, navigate to:
src/test/resources/atlassian-plugin.xml
Add the following REST plugin module inside the atlassian-plugin body:
...
Create a new source file:
src/test/java/com/newverveconsulting/rest/FastDefReloadWithTests.java
This Java class will help us stub out the REST endpoint. Inside, add the following contents:
package com.newverveconsulting.rest; import com.atlassian.plugin.spring.scanner.annotation.component.Scanned; import com.atlassian.plugins.rest.common.security.AnonymousAllowed; import javax.ws.rs.Consumes; import javax.ws.rs.POST; import javax.ws.rs.Path; import javax.ws.rs.core.MediaType; import javax.ws.rs.core.Response; import javax.ws.rs.ext.Provider; @Provider @Path("/") @Scanned public class FastDefReloadWithTests { @POST @Consumes({MediaType.APPLICATION_JSON}) @Path("/reload/withtests") @AnonymousAllowed public Response withTest() { return Response.status(Response.Status.NO_CONTENT).build(); } }
Essentially that’s it, and you can now continue with the wired test tutorial, but I suggest reading on. Next, we’ll show you how to add a link to the wired test console in the UI, to make development easier.
Step 3: Add a navigation bar item
This module will add a link to the top of Jira, so that it is easier to access the wired test console. Again, the module does not need to be in the main production package.
Navigate to:
src/test/resources/atlassian-plugin.xml
Add the following web item plugin module inside the atlassian-plugin body:
... /plugins/servlet/it-test-console ...
Step 4: Build, install, and run your plugin
On your command line, run the following command:
atlas-debug
This might take a while so get a cuppa tea (or 5).
Navigate to your local Jira instance in your browser, by default:
http://localhost:2990/jira/secure/Dashboard.jspa
Log in using “admin” as your username and password. You might need to walk through account creation and/or create some sample mock data.
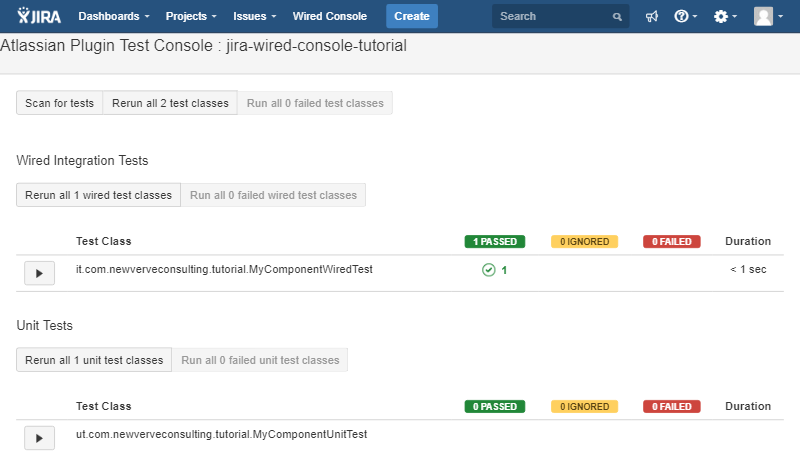
Notice that ‘Wired Console’ is now on the top navigation bar. When you click on the link, it will take you to your local wired test console, where you can start running wired tests.
There you have it! You should now be able to run the test console without enabling FastDev.
Repository
You can find the source code of our tutorial at https://bitbucket.newverveconsulting.com/projects/PUB/repos/jira_wired_test_console_tutorial.
JAR
If you are extra lazy, you can simply use the JAR located at the base of the repository and upload it to your development instance.
Comments:
There are no comments for this entry yet.