
Automating Atlassian Application Setup Wizards with Python and Mechanize
Nobody likes filling in forms, especially when you can program a way to do them for you!
This tutorial will show you how to automate the setup wizards of Atlassian applications using the Python package Mechanize. This process can be modified to setup any application that has a web install wizard, and can be really useful if you manage a lot of different applications.
Requirements
You’ll need the following installed:
- Python
- Mechanize - installed via pip
- Atlassian application install package
- License key for that application
- An external database
- Oracle Java 8
Python
Most Linux distributions ship with Python, but if you don’t have it installed you can use your package manager (apt-get, yum, etc) to install it:
$ sudo apt-get install python
$ sudo apt-get install python-pip
OR
$ sudo yum install python
$ sudo yum install python python-pip
If you already have Python installed, you can use easy_install to install Pip:
$ sudo easy_install pip
Once you have Python and Pip installed on your system, you must use Pip to install the Mechanize package. Mechanize allows you to emulate a web browser within Python, which is extremely useful for automating forms such as the Atlassian setup wizard.
$ sudo pip install mechanize
If you’ve already installed Atlassian applications before, you can skip down to Automation.
Java
The process for installing Java will be different depending on what system you’re using. JIRA and Confluence require that you use Oracle’s Java 8. Guides to install Java can be found here:
Applications
Now that you have Python, Pip and Mechanized installed, it’s time to install your Atlassian application. The process for installing an Atlassian application is to download its installer archive from Atlassian’s website, extract the archive to somewhere on your system - in my case it is /opt/atlassian/.
For the sake of this tutorial, I’ll show how to automate the setup of both JIRA and Confluence. Both have slightly different form layouts, and it will be useful to show how to handle these differences programmatically.
We’re downloading JIRA and Confluence from Atlassian’s website. JIRA 7.2 can be found here, and Confluence 5.10.4 here. We’re getting the tar.gz archives, but you could use the binary installers.
Once you’ve downloaded your application, you’ll need to extract it somewhere. We’ll use /opt/atlassian. We’ll first create the /opt/atlassian directory, extract JIRA and Confluence and then rename their directories to jira and confluence respectively:
$ sudo mkdir /opt/atlassian
$ sudo tar x -C /opt/atlassian -f ./atlassian-confluence-5.10.4.tar
$ sudo tar x -C /opt/atlassian -f ./atlassian-jira-software-7.2.0.tar
$ cd /opt/atlassian
$ sudo mv atlassian-confluence-5.10.4 confluence
$ sudo mv atlassian-jira-software-7.2.0-standalone jira
Now we tell Confluence and JIRA where their home directories are. You’ll need to open /opt/atlassian/jira/atlassian-jira/WEB-INF/classes/jira-application.properties in your text editor and add the line “jira.home = /var/atlassian/jira” and for Confluence, open /opt/atlassian/confluence/confluence/WEB-INF/classes/confluence-init.properties and remove the # at the start of the line “confluence.home = /var/atlassian/confluence”.
As we’re using an external MySQL database, we’ll need to download the MySQL connector from Oracle’s site:
$ wget http://dev.mysql.com/get/Downloads/Connector-J/mysql-connector-java-5.1.38.tar.gz
$ tar -zxf mysql-connector-java-5.1.38.tar.gz
$ sudo cp mysql-connector-java-5.1.38/mysql-connector-java-5.1.38-bin.jar /opt/atlassian/jira/lib/
$ sudo cp mysql-connector-java-5.1.38/mysql-connector-java-5.1.38-bin.jar /opt/atlassian/confluence/lib/
You’ll need to then create two new database in MySQL:
$ mysql -h localhost -u root
$ create database `autojira` collate utf8_bin character set utf8;
$ create database `autoconfluence` collate utf8_bin character set utf8;
Automation
Now that you have Java, Python, Mechanize, and your Atlassian application installed, it’s time to move onto automating the setup process. We’ll start with JIRA and move onto Confluence.
JIRA
For JIRA’s installer, you’ll need the following information:
- Title for your JIRA install
- Base URL to be used (we’ll use http://localhost:8080 as we’re installing JIRA locally)
- License Key for installer
- MySQL hostname, username, password and database name (autojira in our case) - although you can use any of the supported databases
- Admin username, password, first and last name and contact email
You’ll need to start JIRA first and wait until you can access it at http://localhost:8080:
$ sudo /opt/atlassian/jira/bin/start-jira.sh
Open up your shell and start Python:
$ python
We’ll then want to import the Mechanize library using “import mechanize”. We’ll also set all the install information as variables so they’ll be easy to refer to - license key is hidden for obvious reasons:
>>> mysql_host = “localhost”
>>> mysql_user = “root”
>>> mysql_pass = “”
>>> mysql_db = “autojira”
>>> jira_title = “Automated JIRA install”
>>> jira_base_url = “http://localhost:8080/”
>>> jira_key = ‘’’ ‘’‘
>>> jira_admin_email = “admin@newverveconsulting.com”
>>> jira_admin_user = “admin”
>>> jira_admin_pass = “adminpass”
>>> jira_admin_firstname = “Admin”
>>> jira_admin_lastname = “Istrator”
Now we’re going to set up the Mechanize browser:
>>> url=“http://localhost:8080/”
>>> br = mechanize.Browser()
>>> br.set_handle_robots(False)
>>> br.open(url)
The order of JIRA’s setup wizard is as follows: Choose install type (we’ll choose self setup), Setup database (we’re using MySQL), Setup title and Base URL, Setup License Key and then setting up JIRA’s admin user. Following the admin user creation, you can add Mail Server information but we’ll skip this part for now.
On the first page of the setup wizard we’re choosing the Classic install mode. This is done using Mechanize’s browser. First we select the form using br.select_form() with the argument nr=0 to tell Mechanize we want the first form of the page. Next we disable the read only attribute of the button on the page, choose which button option we are using (‘classic’) and submit the form:
>>> br.select_form(nr=0)
>>> br.form.find_control(‘setupOption’).readonly = False
>>> br.form[‘setupOption’] = ‘classic’
>>> res = br.submit()
We can view the page we are on’s HTML by referring to res object, with the method read():
>>> print res.read()
Or we can just select the form on the current page, and view the elements that are within that form:
>>> br.select_form(nr=0)
>>> print br.form
Which will output something similar to this:
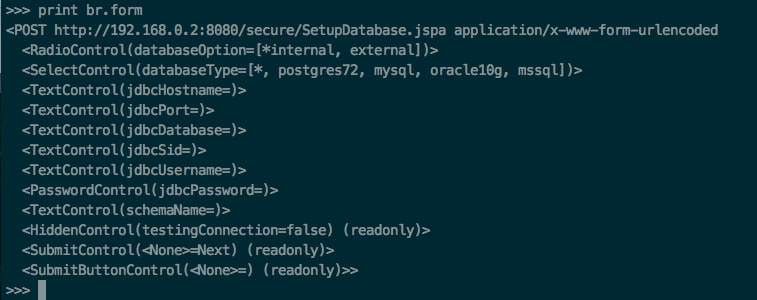
Now we go about filling in the MySQL information:
>>> br.form[‘databaseOption’] = [‘external’]
>>> br.form[‘databaseType’] = [‘mysql’]
>>> br.form[‘jdbcHostname’] = mysql_host
>>> br.form[‘jdbcPort’] = ‘3306’
>>> br.form[‘jdbcDatabase’] = mysql_db
>>> br.form[‘jdbcUsername’] = mysql_user
>>> br.form[‘jdbcPassword’] = mysql_pass
We can ensure that our data was filled in correctly by again running print br.form and making sure the correct values are set before submitting the form.
It might take a bit of time for the MySQL database to be setup, as JIRA will be creating a lot of tables. Once the command has finished running we can then fill in the title and baseurl of our JIRA setup:
>>> br.select_form(nr=0)
>>> br.form[‘title’] = jira_title
>>> br.form[‘baseURL’] = jira_base_url
>>> res = br.submit()
Next up is the license key. There are multiple forms on this page, so we’ll need to select the second (index = 1) which contains the license key input:
>>> br.select_form(nr=1)
>>> br.form[‘setupLicenseKey’]=jira_key
>>> br.submit()
We’ll select the first form of the page and print it out, just to make sure we’re now on the correct page - creating the JIRA admin account:
>>> br.select_form(nr=0)
>>> print br.form
Our form should look this this:
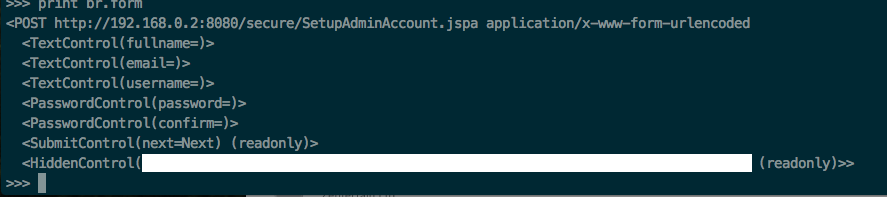
We’re now going to insert the admin user information:
>>> br.form[‘fullname’] = “{} {}”.format(jira_admin_firstname, jira_admin_lastname)
>>> br.form[‘email’] = jira_admin_email
>>> br.form[‘username’] = jira_admin_user
>>> br.form[‘password’] = jira_admin_pass
>>> br.form[‘confirm’] = jira_admin_pass
Submit the form again using br.submit().
Next up is the mail server information. We’re going to leave this part out by choosing the setup mail server later option. If you do have an available mail server, you could add your own data here instead of choosing to set it up later. In our case we’re just going to select and then submit the form using the default options:
>>> br.select_form(nr=0)
>>> br.submit()
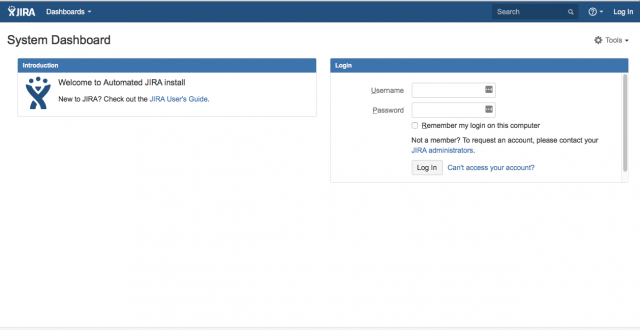
You can now head to http://localhost:8080 and sign in using the admin username and password you supplied to confirm that the setup has worked for you. You should see the JIRA dashboard when you visit the link.
Confluence
Now we’re going to setup Confluence. We’ll need the same information as the JIRA setup, minus the base URL. To start we’ll need to launch Confluence:
$ sudo /opt/atlassian/confluence/bin/start-confluence.sh
Head to http://localhost:8090 to confirm that Confluence has started up.
Then we’re going to input all the data required:
>>> mysql_host = “localhost”
>>> mysql_user = “root”
>>> mysql_pass = “”
>>> mysql_db = “autoconfluence”
>>> confluence_title = “Automated Confluence Install”
>>> confluence_key = ‘’‘’‘’
>>> confluence_admin_email = “admin@newverveconsulting.com”
>>> confluence_admin_user = “admin”
>>> confluence_admin_pass = “adminpass”
>>> confluence_admin_firstname = “Admin”
>>> confluence_admin_lastname = “Istrator”
Confluence’s setup wizard is a little different from JIRA’s. First we choose the setup type, then we choose which add-ons we want installed with Confluence (we don’t want any right now so we just submit the empty form). Next we input the license key, followed by choosing our database type, choose an external JDBC and fill in the MySQL information. Following this, we choose to use an empty site setup and then fill in the admin user info.
Setup the Mechanize browser and tell it to open Confluence’s setup wizard:
>>> url=‘http://localhost:8090/’
>>> br = mechanize.Browser()
>>> br.set_handle_robots(False)
>>> br.open(url)
Select the first form on the page using br.select_form(nr=0), disable the read only attribute of the setupType input and set its value to classic for a custom install, then we submit the form:
>>> br.select_form(nr=0)
>>> br.form.find_control(‘setupType’).readonly = False
>>> br.form[‘setupType’] = ‘custom’
>>> br.submit()
The next page is the add-ons to install, we don’t want any so we’ll just select and submit this form:
>>> br.select_form(nr=0)
>>> res = br.submit()
Next up is the license key:
>>> br.select_form(nr=0)
>>> br.form[‘confLicenseString’]=confluence_key
>>> br.submit()
Now we choose our database type - MySQL:
>>> br.select_form(nr=0)
>>> br.form[‘dbChoiceSelect’] = [‘mysql’]
>>> res = br.submit()
We now tell Confluence to use an external JDBC:
>>> br.select_form(nr=0)
>>> res = br.submit()
We should now be on the database information page of the setup wizard. You can confirm this by selecting the first form using br.select_form(nr=0) and then printing the form contents:
Which should look like this:

Now we input our database info:
>>> br.form[‘dbConfigInfo.databaseUrl’] = “jdbc:mysql://{}/{}?autoReconnect=true&characterEncoding=utf8&useUnicode=true”.format(mysql_host, mysql_db)
>>> br.form[‘dbConfigInfo.userName’] = mysql_user
>>> br.form[‘dbConfigInfo.password’] = mysql_pass
>>> br.submit()
It’ll take a bit of time for Confluence to propagate its database. Once it’s completed the database install, we’ll choose an empty Confluence site - the second form on the page:
>>> br.select_form(nr=1)
>>> br.submit()
Next up is choosing our user management scheme. We want Confluence to manage its own users, although we could choose JIRA to manage our Confluence users and fill in the information from our JIRA auto setup here. In our case we’ll just skip to the next page:
>>> br.select_form(nr=0)
>>> br.submit()
Now we setup out Confluence admin user:
>>> br.select_form(nr=0)
>>> br.form[‘fullName’] = “{} {}”.format(confluence_admin_firstname, confluence_admin_lastname)
>>> br.form[‘email’] = confluence_admin_email
>>> br.form[‘username’] = confluence_admin_user
>>> br.form[‘password’] = confluence_admin_pass
>>> br.form[‘confirm’] = confluence_admin_pass
>>> br.submit()
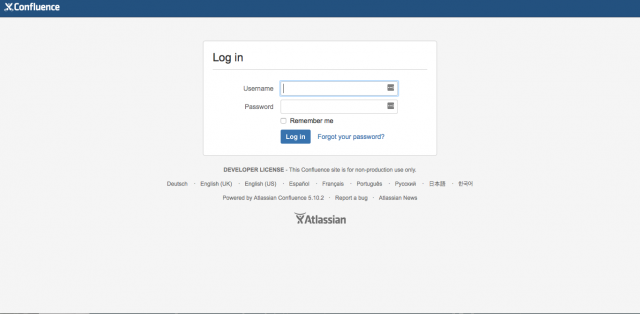
And we’re done! Head over to http://localhost:8090 to confirm that the Confluence home page is now showing, and try logging in with your admin user and password:
Full Scripts
I’ve uploaded the full automated installer scripts to a public Bitbucket repository. All you need to do is fill in the information at the beginning of the script, start the application you are installing and then run its installer script using:
$ python {script-name}.py
What’s next?
We skipped over the JIRA mail server information, but if you have a mail server that you wish to use with your JIRA setup, you could first view the form in your browser to work out the names of each input, and then fill in those inputs with your server details using Mechanize. You could also modify the Confluence installer to use JIRA as a user management system.
Related Reading
If you enjoyed this blog, you may like How to simplify and improve your Jira workflows
Comments:
Excellent tutorial , I can’t believe there’s no officially supported way to avoid the GUI installer.
Tried doing it this way and running into issues around the DB submit form
>>> print br.form
>
>>> res = br.submit()
Traceback (most recent call last):
File “”, line 1, in
File “/usr/lib/python2.7/site-packages/mechanize/_mechanize.py”, line 683, in submit
return self.open(self.click(*args, **kwds))
File “/usr/lib/python2.7/site-packages/mechanize/_mechanize.py”, line 254, in open
return self._mech_open(url_or_request, data, timeout=timeout)
File “/usr/lib/python2.7/site-packages/mechanize/_mechanize.py”, line 310, in _mech_open
raise response
mechanize._response.httperror_seek_wrapper: HTTP Error 500:
any ideas on how to debug ? The server itself is still up if I hit it manually and go in via a web browser.
By Shane
on Mon, April 17, 2017
I simply wanted to write down a quick word to say thanks to you for those wonderful tips and hints you are showing on this site.
By suresh kumar
on Thu, June 07, 2018
I prefer to study this kind of material. Nicely written information in this post, the quality of content is fine and the conclusion is lovely. Things are very open and intensely clear explanation of issues
By saimouni
on Thu, September 27, 2018
Hi all,
This sounds super awesome! One problem:
Does anyone have a work source code link? The GitHub link is dead :-(
Regards,
David
By David
on Wed, April 03, 2019
The link is now working! Apologies - moved to a Bitbucket repository.
By nigel
on Wed, April 03, 2019
What if I just prefer the in-memory H2 database (DB setup automatically, not “Setup myself”)? How would I change it?
It is an excellent tutorial!! Thanks for putting it together!!
By Srini Chimata
on Thu, July 16, 2020